1.6-1.12 Learning Notes

python spider

https://segmentfault.com/blog/papapa

analyse website

Chrome+F12

construct url

通过对不同页面的url分析,得到有用的参数,从而构造出url

request header

从request里面复制,模拟真实请求

def cookie_to_dict(cookie):
    cookie_dict = {}
    items = cookie.split(';')
    for item in items:
        key = item.split('=')[0].replace(' ', '')
        value = item.split('=')[1]
        cookie_dict[key] = value
    return cookie_dict
r = requests.get(url,headers=headers, cookies=cookies)

select info

bs4

语法简单,容易上手

xpath

XML中查找信息
selenium里面也会用到

regex

应用范围最广,但是上手难
https://regex101.com/r/dmRygT/1
https://deerchao.cn/tutorials/regex/regex.htm

selenium

https://segmentfault.com/a/1190000015750160
模拟用户操作,实现反爬虫

find_element vs find_elements

find_element return a webelement
find_elements return a iterable list
webelement.text return text

allComments = driver.find_elements(By.XPATH, "//div[@class='itm']")
for each in allComments:
    name = each.find_elements_by_xpath(
        "./div[@class='cntwrap']/div[1]/div[1]/a")[0].text

等待网页加载

explicit

显式Wiats允许你设置一个加载时间的上限和一个条件,每隔0.5s就判断一下所设条件,条件成立就继续执行下面的代码,如果过了时间上限还是没有成立,默认抛出NoSuchElementException 异常。这种相对智能的等待方法能最大化地节省时间,应该优先选择使用

implicit

driver.implicitly_wait(10)

mysql store data

https://dev.mysql.com/doc/refman/8.0/en/identifiers.html
用反引号`包住保留字(表名、字段名等)
用双引号”或单引号’包住字符串
在python里写sql时,用三个引号”””包住sql语句

cursor.execute("DROP TABLE IF EXISTS `netease`.`{}`".format(tableName))
cursor.execute("""CREATE TABLE `{}` (
    `id` INT NOT NULL AUTO_INCREMENT,
    `name` VARCHAR(100),
    `comment` VARCHAR(10000),
    `lovenumber` INT,
    `commenttime` VARCHAR(100),
    PRIMARY KEY (`id`)
)""".format(tableName)) 
# 上面均为反引号
sql = """INSERT INTO `netease`.`{tableName}`
        (`name`,`comment`,`lovenumber`,`commenttime`) # 反引号
        VALUES
        ('{name}','{comment}',{lovenumber},'{commenttime}') # 引号
        """ .format(tableName=tableName, name=name, comment=comment, lovenumber=lovenumber, commenttime=commenttime)

OOP Refactor

__enter__ __exit__
写这两个函数就可以用with
https://stackoverflow.com/questions/1984325/explaining-pythons-enter-and-exit

import pymysql


class Mysql():
    def __init__(self, host, user, password, database):
        self.host = host
        self.user = user
        self.password = password
        self.database = database
        self.conn = pymysql.connect(
            host=self.host, user=self.user, password=self.password, database=self.database)
        self.cursor = self.conn.cursor()

    def __enter__(self):
        return self

    def __exit__(self, exc_type, exc_val, exc_tb):
        self.conn.commit()
        self.conn.close()

    def fetchall(self):
        return self.cursor.fetchall()

    def execute(self, sql):
        return self.cursor.execute(sql)

    def query(self, sql):
        self.cursor.execute(sql)
        return self.fetchall()
    
    def commit(self):
        return self.conn.commit()
    
    def close(self):
        return self.conn.close()

生成词云

先用jieba分割词语,再用wordcloud

import matplotlib.pyplot as plt
from wordcloud import WordCloud
import jieba
import src.Mysql


class MyWordCloud:
    def __init__(self, song):
        self.song = song
        self.origin_text = self.fromDBGetText()
        self.wordlist_after_jieba = self.jiebaDiv()
        self.wordcloud = self.getWordCloud()

    def fromDBGetText(self):
        with src.Mysql.Mysql('127.0.0.1', 'root', 'password', 'netease') as db:
            sql = """
            SELECT comment FROM netease.{};
            """.format(self.song)
            self.origin_text = db.query(sql)
        return self.origin_text

    def jiebaDiv(self):
        self.wordlist_after_jieba = jieba.cut(
            str(self.origin_text), cut_all=True)
        return " ".join(self.wordlist_after_jieba)

    def getWordCloud(self):
        return WordCloud(collocations=False, width=2000,
                         height=2000).generate(self.wordlist_after_jieba)
        # collocations=False 去除重复词语

    def saveToFile(self):
        self.wordcloud.to_file('./img/{}.png'.format(self.song))

    def plotImg(self):
        plt.imshow(self.wordcloud)
        plt.axis("off")
        plt.show()

多线程、多进程

Learning~

Some Useful Commands

Linux

  • touch newfile.md
  • leafpad
  • tree
  • tmux mutiple windows
  • ctrl+r 搜索最近命令

vim

  • i insert model
  • :wq save and exit
  • :q! exit without save
  • dd delete current line
  • hjkl move cursor
  • u undo
  • x delete one text

npm

  • npm -i xxx -s

cd

  • cd\ 根目录
  • cd.. 上一级目录
  • cd >test.md 创建空文件

mkdir 创建目录

12.16-12.22 Learning Notes

Mongodb

set up server on AWS EC2

https://docs.mongodb.com/manual/introduction/
https://ianlondon.github.io/blog/mongodb-auth/

securely close mongodb service

use admin
db.shutdownServer()
exit

if not properly closed:
Run
ps -eaf | grep mongod to find the running instance.
If running, kill the process sudo kill <pID> obtained from above grep command.
https://stackoverflow.com/questions/44497009/mongod-error-98-unable-to-lock-file-data-db-mongod-lock-resource-temporarily/44498179

connect to mongodb server

Obtain your MongoDB connection string
https://docs.mongodb.com/manual/reference/connection-string/

12.9-12.15 Learning Notes

Final来了

AWS

Free resources for student
https://github.com/ivmm/Student-resources

玩一玩linux和云服务器

connect to AWS

需要一个密钥对,不是普通的输入密码
服务器重启后地址会改变,要手动更换

putty&ssh

set font in putty

sudo大法好

能解决很多奇怪的问题

vim

really hard to learn
https://coolshell.cn/articles/5426.html

run mysql

https://www.digitalocean.com/community/tutorials/how-to-install-mysql-on-ubuntu-18-04

run ss server

https://cs.xieyonghui.com/linux/shadowsocks-install-and-configuration_20.html

differences between vpn and ss

https://superuser.com/questions/1233614/what-is-the-difference-between-shadowsocks-and-openvpn

sourcetrail

一个神奇的项目代码可视化工具
https://www.sourcetrail.com/documentation/

Typescript

略微了解
https://stackoverflow.com/questions/12694530/what-is-typescript-and-why-would-i-use-it-in-place-of-javascript/35048303#35048303

12.2-12.8 Learning Notes

Java

变量

写OJ题就public static

  • 静态
  • 实例

SecondMST

次小生成树

暴力枚举不在最小生成树中的边(u,v,w)(称为无用边)
求最小生成树中u-v的权值最大的边,用当前枚举到的无用边(称为关键边)替换权值最大的边,得到一棵生成树。
枚举所有无用边后,取最大的生成树即为次小生成树。

用倍增+LCA求u-v中权值最大的边
O(nlogn)(不包括求最小生成树的复杂度)

严格次小生成树

https://www.luogu.com.cn/problem/P4180
倍增时多维护一个u-v上的严格次大值

long long calSecondMax(long long maxn1, long long maxn2, long long secondmaxn1, long long secondmaxn2)
{
    if (maxn1 > maxn2)
    {
        return max(maxn2, max(secondmaxn1, secondmaxn2));
    }
    if (maxn1 < maxn2)
    {
        return max(maxn1, max(secondmaxn1, secondmaxn2));
    }
    if (maxn1 == maxn2)
    {
        return max(secondmaxn1, secondmaxn2);
    }
    return 0;
}
//dfs中初始化倍增数组
for (long long i = 1; (1 << i) <= depth[u]; i++)
    {
        f[u][i] = f[f[u][i - 1]][i - 1];
        wMax[u][i] = max(wMax[u][i - 1], wMax[f[u][i - 1]][i - 1]);
        wSecondMax[u][i] = calSecondMax(wMax[u][i - 1], wMax[f[u][i - 1]][i - 1], wSecondMax[u][i - 1], wSecondMax[f[u][i - 1]][i - 1]);
    }
//计算u-v最大边权
//keyweight是关键边长度
long long calUtoVMaxWeight(long long u, long long v, long long keyweight)
{
    long long umaxWeight = -INF;
    long long vmaxWeight = -INF;
    if (depth[u] < depth[v])
    {
        swap(u, v);
    }
    for (long long j = maxDepth; j >= 0; j--)
    {
        if (depth[u] > depth[v] && depth[f[u][j]] >= depth[v])
        {
            //当关键边长度=最大边权时,取严格次大值
            if (wMax[u][j] < keyweight)
                umaxWeight = max(umaxWeight, wMax[u][j]);
            else
                umaxWeight = max(umaxWeight, wSecondMax[u][j]);
            u = f[u][j];
        }
    }
    if (u == v)
        return umaxWeight;
    for (long long j = maxDepth; j >= 0; j--)
    {
        if (f[u][j] != f[v][j])
        {
            // 两种写法等价
            // 1.求四个数中的严格次小值
            // long long maxn = max(wMax[v][j], wMax[u][j]);
            // long long minx = min(wMax[v][j], wMax[u][j]);
            // if (maxn < keyweight)
            // {
            //     maxWeight = max(maxWeight, maxn);
            // }
            // else if (minx < keyweight)
            // {
            //     maxWeight = max(max(minx, maxWeight), max(wSecondMax[v][j], wSecondMax[u][j]));
            // }
            // else
            // {
            //     maxWeight = max(maxWeight, max(wSecondMax[v][j], wSecondMax[u][j]));
            // }

            // 2.LCA(u,v)左右子树分开来计算,最后再合并
            if (wMax[u][j] < keyweight)
                umaxWeight = max(umaxWeight, wMax[u][j]);
            else
                umaxWeight = max(umaxWeight, wSecondMax[u][j]);
            u = f[u][j];

            if (wMax[v][j] < keyweight)
                vmaxWeight = max(vmaxWeight, wMax[v][j]);
            else
                vmaxWeight = max(vmaxWeight, wSecondMax[v][j]);
            v = f[v][j];
        }
    }
    long long j = 0;
    if (wMax[u][j] < keyweight)
        umaxWeight = max(umaxWeight, wMax[u][j]);
    else
        umaxWeight = max(umaxWeight, wSecondMax[u][j]);

    if (wMax[v][j] < keyweight)
        vmaxWeight = max(vmaxWeight, wMax[v][j]);
    else
        vmaxWeight = max(vmaxWeight, wSecondMax[v][j]);
    return max(umaxWeight, vmaxWeight);
}

Opencv

install

visual studio is ok
vscode is hard to configure

color detection

https://www.opencv-srf.com/2010/09/object-detection-using-color-seperation.html

use HSV to select certain color
色调、饱和度、亮度

HUE is unique for that specific color distribution of that object
SATURATION and VALUE may be vary according to the lighting condition of that environment

You have to find the exact range of HUE values according to the color of the object
The SATURATION and VALUE is depend on the lighting condition of the environment as well as the surface of the object.

Morphological Dilation and Erosion

降噪算法
https://ww2.mathworks.cn/help/images/morphological-dilation-and-erosion.html

Dilation adds pixels to the boundaries of objects in an image, while erosion removes pixels on object boundaries.

The number of pixels added or removed from the objects in an image depends on the size and shape of the structuring element used to process the image

dilation

补漏洞
The value of the output pixel is the maximum value of all pixels in the neighborhood

erosion

去除小点
The value of the output pixel is the minimum value of all pixels in the neighborhood

调参游戏

holding self-driving boat competition

设计无人船比赛方案

locating and navigation

  • IMU
  • 超声波
  • UWB
  • CV
  • DR算法

卡尔曼滤波

https://blog.csdn.net/u010720661/article/details/63253509
(假装自己看得懂)

11.25-12.1 Learning Notes

pygame

read Snake Game program

use pygame document

https://www.pygame.org/docs/

def init

构造函数

why self?

https://stackoverflow.com/questions/2709821/what-is-the-purpose-of-the-word-self-in-python

Let’s say you have a class ClassA which contains a method methodA defined as:

def methodA(self, arg1, arg2):
    # do something

and ObjectA is an instance of this class.

Now when ObjectA.methodA(arg1, arg2) is called, python internally converts it for you as:

ClassA.methodA(ObjectA, arg1, arg2)

The self variable refers to the object itself.

from pygame.locals import *

import all constants in pygame
such as

KEYDOWN
QUIT
MOUSEMOTION

pygame.time

fps_clock = pygame.time.Clock()
# create a new Clock object
fps_clock.tick(snake.speed)
# set the frame per second (fps)

write Flappy Bird program

draw rectangle

left and top

20191201145419.png

class Hero(pygame.sprite.Sprite):

pygame.sprite.Group()

for event in pygame.event.get():

pygame.sprite.groupcollide

data structure

red-black tree

properties

  • Every node is either red or black
  • The root is black
  • Every leaf (NIL) is black
  • If a node is red, then both its children are black
  • No two consecutive red nodes on a simple path from the root to a leaf
  • For each node, all paths from that node to descendant leaves contain the same number of black nodes
    20191201145818.png

rotation

20191201145928.png
20191201145942.png

AVL tree

properties

The height of the left and right subtrees can differ by at most 1.

maintein

20191201150107.png

LL

20191201150449.png
20191201150456.png

LR

20191201150509.png
20191201150527.png

11.18-11.24 Learning Notes

async & await

// 多个await 顺序执行
async function main() {
  try {
    const val1 = await firstStep();
    const val2 = await secondStep(val1);
    const val3 = await thirdStep(val1, val2);

    console.log('Final: ', val3);
  }
  catch (err) {
    console.error(err);
  }
}

// for循环内部的await
const superagent = require('superagent');
const NUM_RETRIES = 3;

async function test() {
  let i;
  for (i = 0; i < NUM_RETRIES; ++i) {
    try {
      await superagent.get('http://google.com/this-throws-an-error');
      break;
    } catch(err) {}
  }
  console.log(i); // 3
}

test();

await应该放在try–catch结构里面,以免出错

sequelize

operators 逻辑运算符

https://sequelize.org/master/manual/querying.html#operators

[Op.or]
[Op.like]

order

https://sequelize.org/master/manual/querying.html#ordering

order: [['Turnover', 'DESC']]//降序
order: [['Purchased', 'ASC']]//升序

limit

限制数量

用变量来构建对象

// imageObject={Image_num:ImageURL}
// 其中num、ImageURL由用户输入

//1.字符串拼接+JSON.parse()
let num=1;
let ImageIndex = "Image_" + num;
let str = "{\"" + ImageIndex + "\":\"" + ImageURL + "\"}";//用\实现转义
let imageObject = JSON.parse(str);

//2.ES6中表达式可以作为key
let num = 10;
let ImageIndex = "Image_" + num;
let ImageURL = "www.google.com";

let imageObject = {
    [ImageIndex]:ImageURL
}
console.log(imageObject["Image_10"]);//www.google.com
console.log(imageObject[ImageIndex]);//www.google.com

10.28-11.3 Learning Notes

Sequelize

将renter项目中的sql全部改成sequelize
以下是我的代码重构历程:

在原代码基础上稍作改动

如何进行代码测试?

session如何连接

由于不会连接session,所以我在另一个较简单的express框架下测试,可以直接用post/get等方法测试

使用sequelize默认命名风格还是遵循原代码命名风格?

还是用原代码的吧,否则要改的东西更多

介绍sequelize的默认命名风格

model是单数
table是复数
e.g user是模型名称,users是表名称
默认主键是id
默认添加两个元素:createdAt和updatedAt 保存了时间信息

如何在sequelize自定义模型

在网上找了很久,相关的资料比较少,按照官方文档去写,不知道为什么运行出错,有待进一步研究
https://github.com/demopark/sequelize-docs-Zh-CN/blob/master/legacy.md
最后通过define方法解决,还没弄清为什么用init不行
https://sequelize.readthedocs.io/en/v3/docs/legacy/

module.exports = (sequelize, DataTypes) => {
    const user = sequelize.define('user', {
        UserID: {
            type: DataTypes.UUID,
            primaryKey: true,
            autoIncrement: true 
        },
        Gender: DataTypes.STRING,
        Avatar: DataTypes.STRING,
        Openid: DataTypes.STRING,
        Email: DataTypes.STRING,
        Name: DataTypes.STRING,
        FirstLogin: DataTypes.INTEGER,
        DefaultAddress: DataTypes.INTEGER,
    }, {
        tableName: 'user',
    });

如何关闭时间戳

createdAt和updatedAt
两种方法:
1.在模型文件里面添加,只对单个模型生效

var userDetails = sequelize.define('userDetails', {
    userId :Sequelize.INTEGER,
    firstName : Sequelize.STRING,
    lastName : Sequelize.STRING,
    birthday : Sequelize.DATE
}, {
    timestamps: false
});

2.在建立连接的时候添加,对所有模型生效

//使用config.json时的写法
//在config.json里面添加
"define": {
            "timestamps": false
        }

//不使用config.json时的写法
var sequelize = new Sequelize('sequelize_test', 'root', null, {
    host: "127.0.0.1",
    dialect: 'mysql',
    define: {
        timestamps: false
    }
});

工作进度

建立自定义模型,适配原来的数据库
写了前两个接口
route.js里面还要很多接口要修改

// get user info
router.post('/getUserInfo', async function (req, res) {
    let UserID = req.body.UserID || '';
    console.log(UserID);
    try {
        let result = await models.user.findByPk(UserID);
        return res.json(result);
    }
    catch (err) {
        console.error(err);
        return res.json({ ret_code: 2, ret_msg: 'FAL' });
    }
})

//check // update user info
router.post('/updateUserInfo', async function (req, res) {
    let Name = req.body.Name || 0;
    let Gender = req.body.Gender || 0;
    let Email = req.body.Email || 0;
    let UserID = req.body.UserID || 0;
    let params = [Name, Gender, Email, UserID];
    try {
        let result = await models.user.findByPk(UserID);
        return result.update(req.body);
    }
    catch (err) {
        console.error(err);
        return res.json({ ret_code: 2, ret_msg: 'FAL' })
    }
})

10.21-10.27 Learning Notes

printf & scanf in c++

https://stackoverflow.com/questions/4264127/correct-format-specifier-for-double-in-printf

printf(“%f”)==printf(“%lf%”)

Only use %f is OK

scanf(“%f”)!=scanf(“%lf”)

“%f” is the (or at least one) correct format for a double. There is no format for a float, because if you attempt to pass a float to printf, it’ll be promoted to double before printf receives it. “%lf” is also acceptable under the current standard – the l is specified as having no effect if followed by the f conversion specifier (among others).

Note that this is one place that printf format strings differ substantially from scanf (and fscanf, etc.) format strings. For output, you’re passing a value, which will be promoted from float to double when passed as a variadic parameter. For input you’re passing a pointer, which is not promoted, so you have to tell scanf whether you want to read a float or a double, so for scanf, %f means you want to read a float and %lf means you want to read a double (and, for what it’s worth, for a long double, you use %Lf for either printf or scanf).

Machine Learning

https://gitbook.cn/gitchat/column/5d9efd3feb954a204f3ab13d

PDF:probability density function 概率密度函数

在数学中,连续型随机变量的概率密度函数(在不至于混淆时可以简称为密度函数)是一个描述这个随机变量的输出值,在某个确定的取值点附近的可能性的函数。

PMF: probability mass function概率质量函数

在概率论中,概率质量函数是离散随机变量在各特定取值上的概率。

CDF :cumulative distribution function累积分布函数

是概率密度函数的积分,能完整描述一个实随机变量X的概率分布。

Why use fig, ax = plt.subplots(3, 1)

https://stackoverflow.com/questions/34162443/why-do-many-examples-use-fig-ax-plt-subplots-in-matplotlib-pyplot-python
plt.subplots() is a function that returns a tuple containing a figure and axes object(s). Thus when using fig, ax = plt.subplots() you unpack this tuple into the variables fig and ax. Having fig is useful if you want to change figure-level attributes or save the figure as an image file later (e.g. with fig.savefig(‘yourfilename.png’)).

Binominal Distribution

$$P(X=k)=C_n^kp^k(1-p)^{n-k}$$
Draw PMF Graph:

from scipy.stats import binom
import matplotlib.pyplot as plt
import seaborn
seaborn.set()

fig, ax = plt.subplots(1, 1)
x = range(0, 11)

binom_rv = binom(n=10, p=0.25)
ax.plot(x, binom_rv.pmf(x), 'bo', ms=8)
ax.vlines(x, 0, binom_rv.pmf(x), colors='b', lw=3)
ax.set_xlim(0, 10)
ax.set_ylim(0, 0.35)
ax.set_xticks(x)
ax.set_yticks([0, 0.1, 0.2, 0.3])

plt.show()

Simulate:

binom_rvs = binom_rv.rvs(size=100000)
E_sim = np.mean(binom_rvs)  # 期望
S_sim = np.std(binom_rvs)  # 标准差
V_sim = S_sim * S_sim  # 方差

Geometric Distribution

$$P(X=k)=(1-p)^{k-1}p$$

为什么样本方差是除以n-1

$$S^2=\frac{1}{n-1}\sum_{i=1}^n(X_i-\overline{X})^2$$

一个好的估计量应具有无偏性

估计误差的期望为0

用python模拟

从均值为 0,标准差为 1的标准正态分布中获取样本,每次获取 100个样本值,我们重复实验 100万次,把 100万次得到的统计量绘制成直方图,看看它们的分布,并与真实的总体方差进行比较。

from scipy.stats import norm
import matplotlib.pyplot as plt
import numpy as np
import seaborn

seaborn.set()

norm_rv = norm(loc=0, scale=1)
x = np.linspace(0, 2, 1000)

sample_n = 100
s_array = []
for i in range(1000000):
    norm_rvs = norm_rv.rvs(size=sample_n)
    x_bar = sum(norm_rvs) / float(sample_n)
    s = sum(np.square((norm_rvs - x_bar))) / float(sample_n)
    s_array.append(s)

print(np.mean(s_array))
plt.hist(s_array, bins=100, normed=True, alpha=0.6)
plt.axvline(1, ymax=0.8, color='r')
plt.gca().axes.set_xlim(0.4, 1.6)
plt.show()

数学证明

https://www.zhihu.com/question/20099757/answer/26586088

Nodejs Static html

  • 设置首页
  • 404页面
  • 识别文件类型并正确显示
./model/FromFileGetExtname.js
let fs = require('fs');
exports.getMime = function (fs, extname) {

    //异步程序
    // fs.readFile('./mime.json', (err, data) => {
    //     if (err) {
    //         console.log('not exist');
    //         return false;
    //     }
    //     let Mime = JSON.parse(data.toString());
    //     return Mime[extname];
    // })

    //改成同步读取
    let data = fs.readFileSync('./mime.json');
    let Mimes = JSON.parse(data.toString());//convert json into object
    return Mimes[extname];
}
let http = require('http');
let fs = require('fs');
let path = require('path');
let url = require('url');
let extnameModel = require('./model/FromFileGetExtname.js');

http.createServer((req, res) => {
    let pathname = url.parse(req.url).pathname;//获取url请求
    if (pathname == '/') {
        pathname = '/index.html';//设置首页
    }
    let extname = path.extname(pathname);
    if (pathname != '/favicon.ico') {
        console.log(pathname);
        fs.readFile('static/' + pathname, (err, result) => {
            if (err) {
                console.error('404');

                fs.readFile('static/404.html', (err, errorData) => {//404 page
                    res.writeHead(404, { "Content-Type": "text/html;charset='utf-8'" });
                    res.write(errorData);
                    res.end();
                })
            }
            else {
                let name = extnameModel.getMime(fs,extname);//识别文件类型
                res.writeHead(200, { "Content-Type": "" + name + ";charset='utf-8'" });
                res.write(result);
                res.end();
            }
        })
    }
}).listen(3000);

ES6 Style

let+const replace var

不需要改变的量用const
其余用let

解构赋值

本质上,这种写法属于“模式匹配”,只要等号两边的模式相同,左边的变量就会被赋予对应的值。

数组解构

let [foo, [[bar], baz]] = [1, [[2], 3]];
foo // 1
bar // 2
baz // 3

//不完全解构
let [x, y] = [1, 2, 3];
x // 1
y // 2

let [a, [b], d] = [1, [2, 3], 4];
a // 1
b // 2
d // 4

//默认值
let [foo = true] = []; //foo=true
let [x, y = 'b'] = ['a']; // x='a', y='b'
let [x, y = 'b'] = ['a', undefined]; // x='a', y='b'

对象解构

对象的解构与数组有一个重要的不同。数组的元素是按次序排列的,变量的取值由它的位置决定;而对象的属性没有次序,变量必须与属性同名,才能取到正确的值。

let { bar, foo } = { foo: 'aaa', bar: 'bbb' };
foo // "aaa"
bar // "bbb"

let { baz } = { foo: 'aaa', bar: 'bbb' };
baz // undefined

优先使用解构赋值

//使用数组成员对变量赋值时,优先使用解构赋值。
const arr = [1, 2, 3, 4];

// bad
const first = arr[0];
const second = arr[1];

// good
const [first, second] = arr;

//函数的参数如果是对象的成员,优先使用解构赋值。
let Vip = { firstName: "V", lastName: "ip" };
//bad
function getFullName(user) {
    const firstName = user.firstName;
    const lastName = user.lastName;
    console.log(firstName);
    console.log(lastName);
}

//good
function getFullName({ firstName, lastName }) {
    console.log(firstName);
    console.log(lastName);
}

getFullName(Vip);

什么时候使用箭头函数?

https://jingsam.github.io/2016/12/08/things-you-should-know-about-arrow-functions.html
箭头函数没有this

function foo() {
    this.a = 1
    let b = () => console.log(this.a)//引用了父级作用域中的foo().a
    b()
}
foo()  // 1

20191027164045.png

Module语法

使用import代替require
使用export取代module.exports

// commonJS的写法
var React = require('react');

var Breadcrumbs = React.createClass({
  render() {
    return <nav />;
  }
});

module.exports = Breadcrumbs;

// ES6的写法
import React from 'react';

class Breadcrumbs extends React.Component {
  render() {
    return <nav />;
  }
};

export default Breadcrumbs;

Sequelize

https://www.bilibili.com/video/av59809408
https://itbilu.com/nodejs/npm/VyqgRUVf7.html

(optional) install cnpm(国内镜像)

npm install -g cnpm --registry=https://registry.npm.taobao.org

build environment

cnpm i sequelize -s
cnpm i sequelize-cli -s 命令行工具
cnpm i mysql2 -s
sequelize init

create database

sequelize db:create

按/config/config.json中的配置来建立数据库连接
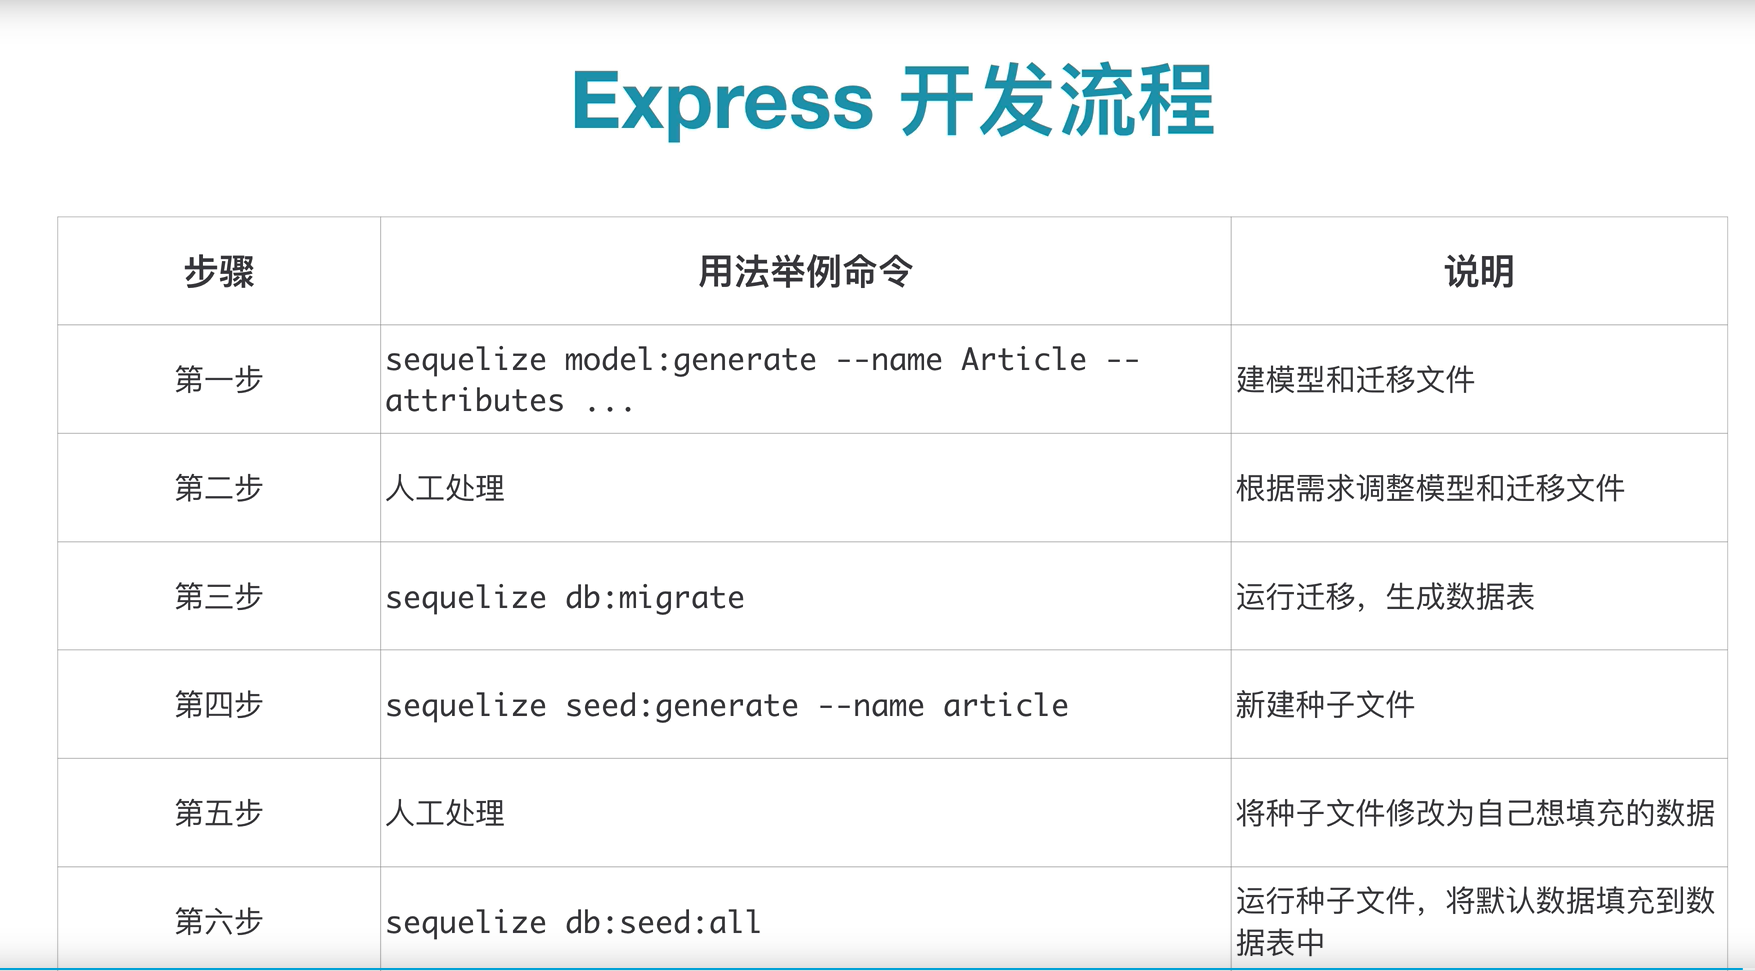
create model&table

relation between model and table

ORM框架的作用就是就是可以把关系型数据库表结构映射为javascript对象
每一个模型对象表示数据库中的一个表,后续对数据库的操作都是通过对应的模型对象来完成

sequelize model:generate --name renters --attributes username:string,password:string --force
--force            Forcefully re-creates model with the same name

在sequelize中,模型是单数,表是复数
生成了模型文件models\renter.js

'use strict';
module.exports = (sequelize, DataTypes) => {
  const renter = sequelize.define('renter', {
    title: DataTypes.STRING,
    context: DataTypes.TEXT
  }, {});
  renter.associate = function(models) {
    // associations can be defined here
  };
  return renter;
};

也生成了迁移文件migrations\20191027094449-create-renter.js

'use strict';
module.exports = {
    //sequelize db:migrate
  up: (queryInterface, Sequelize) => {
    return queryInterface.createTable('renters', {
      id: {
        allowNull: false,//不允许空值
        autoIncrement: true,//自增
        primaryKey: true,//主键
        type: Sequelize.INTEGER
      },
      title: {
        type: Sequelize.STRING
      },
      context: {
        type: Sequelize.TEXT
      },
      createdAt: {
        allowNull: false,
        type: Sequelize.DATE
      },
      updatedAt: {
        allowNull: false,
        type: Sequelize.DATE
      }
    });
  },
  //sequelize db:migrate:undo 迁移记录在就可以撤销迁移操作 
  down: (queryInterface, Sequelize) => {
    return queryInterface.dropTable('renters');
  }
};

会迁移/migrations下的还未执行的迁移文件
数据库中有一个名为SequelizeMeta的表,此表用于记录在当前数据库上运行的迁移

sequelize db:migrate

create seeders

种子文件表示数据的一些变化,可用于使用样本数据或测试数据填充数据库表。

sequelize seed:generate --name demo-renter

编辑种子文件\seeders\20191027112628-demo-renter.js

module.exports = {
    up: (queryInterface, Sequelize) => {
        return queryInterface.bulkInsert('renters', [{
            title: 'Rent',
            context: 'Whatever you want',
            createdAt: '2019.10.27',
            updatedAt: '2019.10.27',
        }], {});
    },
    down: (queryInterface, Sequelize) => {
        return queryInterface.bulkDelete('renters', null, {});
    }
};
sequelize db:seed:all

sequelize-cli

sequelize [命令]

命令:
  sequelize db:migrate                        运行待执行的迁移
  sequelize db:migrate:schema:timestamps:add  更新迁移表以获取时间戳
  sequelize db:migrate:status                 列出所有迁移的状态
  sequelize db:migrate:undo                   恢复迁移
  sequelize db:migrate:undo:all               恢复所有迁移
  sequelize db:seed                           运行指定的种子
  sequelize db:seed:undo                      撤消最近执行的种子
  sequelize db:seed:all                       运行所有种子
  sequelize db:seed:undo:all                  撤消所有已执行的种子
  sequelize db:create                         创建配置中指定的数据库
  sequelize db:drop                           删除配置中指定的数据库
  sequelize init                              初始化项目
  sequelize init:config                       初始化配置
  sequelize init:migrations                   初始化迁移
  sequelize init:models                       初始化模型
  sequelize init:seeders                      初始化种子
  sequelize migration:generate                生成新的迁移文件                         [aliases: migration:create]
  sequelize model:generate                    生成一个模型及迁移文件                 [aliases: model:create]
  sequelize seed:generate                     生成一个新的种子文件                      [aliases: seed:create]

选项:
  --help     显示帮助信息                                                              [布尔]
  --version  显示版本号                                                                [布尔]

20191027193126.png

安利一个VSCODE插件:PicGo

在Markdown中快速插入图片,自动上传到图床

10.14-10.20 Learning Notes

Sequelize

https://itfun.tv/courses/12

model & tables

模型是单数
表是复数

migrations

models

routes

seeders

Nodejs

https://www.bilibili.com/video/av38925557

自定义模块

要让外部访问模块里面的方法

模块文件中:用exports & module.exports暴露方法

exports与module.exports的不同:

1.exports
./node_modules/nav/nav.js
let str = 'this is /node_modules/nav/nav.js';
exports.str=str;

./useNav.js
console.log(nav);
// { str: 'this is /node_modules/nav/nav.js' }

2.module.exports
./node_modules/nav/nav.js
let str = 'this is /node_modules/nav/nav.js';
module.exports = str;

./useNav.js
console.log(nav);
// this is /node_modules/nav/nav.js'

需要访问模块的文件中:require(‘model’);

require

.js可省略
绝对路径写法:
require('./node_modules/bar/bar.js');  
require('./node_modules/bar/bar');

位于node_modules下的写法: 
require('nav/nav');

配置package.json后的写法:
./node_modules/bar/package.json
  "main": "nav.js"

./useNav.js
require('nav');

nodemon

自动更新代码并运行

npm i nodemon -s
./package.json:
"scripts": {
        "start": "nodemon ./yourFile"
    },
npm start

http

let app = http.createServer(function (req, res) {

    res.writeHead(200, { "Content-Type": "text/html;charset='utf-8'" });
    res.write("hello nodejs");
    res.end();
});
app.listen(3000, '127.0.0.1');
url.parse("www.baidu.com");//地址到对象
url.format({    //对象到地址
    ...
});
url.resolve("http://www.baidu.com", 'news')

fs

fs.stat('httpmodel.js', function (err, stats) {//文件信息
    if (err) {
        console.error(err);
        return false;
    }
    console.log('file:' + stats.isFile());
    console.log('directory:' + stats.isDirectory());
})
fs.mkdir('path',callback)//make directory
fs.writeFile('file','content',callback) //会覆盖原来的
fs.appendFile('file','content',callback) //在文件后面加上去
fs.readFile('t.txt', function (err, data) {
    if (err) {
        console.error(err);
        return false;
    }
    console.log(data.toString());
})
fs.readdir('dir',function(err,data))
fs.rename('./app.js','app/app.js',callback) //改名或剪切
fs.rmdir('dir',callback)//remove directory
fs.unlink('file',callback)//删除文件

find all directories in one directory

//let filesArr = [];
fs.readdir('upload', function (err, files) {
    if (err) {
        console.error(err);
        return false;
    }
    else {
        console.log(files);
        for (let i = 0; i < files.length; i++) //let大法好
            fs.stat(files[i], (err, stats) => {
                console.log(files[i]);
            })
        // (function getFile(i) {      //异步+函数+递归

        //     if (i == files.length) {
        //         console.log(filesArr);
        //         return false;
        //     }

        //     fs.stat('html/' + files[i], function (err, stats) {
        //         if (files[i].isDirectory) {
        //             filesArr.push(files[i]);
        //         }
        //         getFile(i + 1);
        //     })
        // })(0)

    }
})

let & var

http://es6.ruanyifeng.com/#docs/let

for (var i = 1; i <= 3; i++)
    setTimeout(() => {
        console.log(i);
    }, 100);
4
4
4

for (let i = 1; i <= 3; i++)
    setTimeout(() => {
        console.log(i);
    }, 100);
1
2
3

上面代码中,变量i是let声明的,当前的i只在本轮循环有效,所以每一次循环的i其实都是一个新的变量。你可能会问,如果每一轮循环的变量i都是重新声明的,那它怎么知道上一轮循环的值,从而计算出本轮循环的值?这是因为 JavaScript 引擎内部会记住上一轮循环的值,初始化本轮的变量i时,就在上一轮循环的基础上进行计算。

箭头函数

var sum = (num1, num2) => num1 + num2;
// 等同于
var sum = function(num1, num2) {
  return num1 + num2;
};

// 正常函数写法
var result = values.sort(function (a, b) {
  return a - b;
});
// 箭头函数写法
var result = values.sort((a, b) => a - b);

Pygame

https://mp.weixin.qq.com/s/Or84egkjMzG3YC8Ed6n1kw

pygame.display.set_mode((width,height))#窗口大小
pygame.display.set_caption()#标题栏
def draw_rect(color, position):#绘制矩形
    pygame.draw.rect(caption, color, pygame.Rect(position[0], position[1], cell, cell))
    #Rect:((x, y), (width, height)) 以(x,y)为左上角,绘制width*height的矩形

10.7-10.13 Learning Notes

by Huang Yongjin

JS Learning

https://wangdoc.com/javascript/index.html
http://es6.ruanyifeng.com/#docs/style#Class

变量提升(hoisting)

//先解析代码,获取所有被声明的变量,然后再一行一行地运行
console.log(a);
var a = 1;

use let instead of var

let 不会变量提升

let 只在块级作用域中有效

let 暂时性死区

ES6 明确规定,如果区块中存在let和const命令,这个区块对这些命令声明的变量,从一开始就形成了封闭作用域。凡是在声明之前就使用这些变量,就会报错。

var tmp = 123;

if (true) {
  tmp = 'abc'; // ReferenceError
  let tmp;
}

严格相等运算符 & 相等运算符

相等运算符会自动转换变量类型,造成很多意想不到的情况。
因此,建议不要使用相等运算符(==),只使用严格相等运算符(===)。

1=='1' //return true
1==='1' //return false

check var

// 错误的写法
if (v) {
  // ...
}
// ReferenceError: v is not defined

// 正确的写法
if (typeof v === "undefined") {
  // ...
}

int? float64!

JavaScript 内部,所有数字都是以64位浮点数形式储存,即使整数也是如此。所以,1与1.0是相同的,是同一个数。

1 === 1.0 // true
//这就是说,JavaScript 语言的底层根本没有整数,所有数字都是小数(64位浮点数)

object

什么是对象? 简单说,对象就是一组“键值对”(key-value)的集合,是一种无序的复合数据集合。

var obj = {
  foo: 'Hello',//use , to separate
  bar: 'World'
};
Object.keys(obj);
//['foo','bar']
delete obj.foo;
obj.foo
//undefined
//遍历对象自身的属性,不包括继承的
for (var key in obj){
    if (obj.hasOwnProperty(key){
        console.log(key);
  }
}

function

function命令声明的代码区块,就是一个函数。function命令后面是函数名,函数名后面是一对圆括号,里面是传入函数的参数。函数体放在大括号里面。

function print(s) {
  console.log(s);
}

//一是可以在函数体内部调用自身,二是方便除错(除错工具显示函数调用栈时,将显示函数名,而不再显示这里是一个匿名函数)
var print = function x(){
  console.log(typeof x);
};

x
// ReferenceError: x is not defined

print()
// function

函数与其它值(数值、字符串、布尔值等等)地位相同

function add(x, y) {
  return x ## y;
}

// 将函数赋值给一个变量
var operator = add;

// 将函数作为参数和返回值
function a(op){
  return op;
}
a(add)(1, 1)
// 2

函数作用域(scope)
函数执行时所在的作用域,是定义时的作用域,而不是调用时所在的作用域。

var a = 1;
var x = function () {
  console.log(a);
};
function f() {
  var a = 2;
  x();
}
f() // return 1

var x = function () {
  console.log(a);
};
function y(f) {
  var a = 2;
  f();
}
y(x)
// ReferenceError: a is not defined

闭包

function f1() {
  var n = 999;
  function f2() {
    console.log(n);
  }
  return f2;
}

var result = f1();
result(); // 999

闭包就是函数f2,即能够读取其他函数内部变量的函数。由于在 JavaScript 语言中,只有函数内部的子函数才能读取内部变量,因此可以把闭包简单理解成“定义在一个函数内部的函数”。闭包最大的特点,就是它可以“记住”诞生的环境,比如f2记住了它诞生的环境f1,所以从f2可以得到f1的内部变量。在本质上,闭包就是将函数内部和函数外部连接起来的一座桥梁。

闭包的最大用处有两个,一个是可以读取函数内部的变量,另一个就是让这些变量始终保持在内存中,即闭包可以使得它诞生环境一直存在。请看下面的例子,闭包使得内部变量记住上一次调用时的运算结果。

function createIncrementor(start) {
  return function () {
    return start++;
  };
}

var inc = createIncrementor(5);

inc() // 5
inc() // 6
inc() // 7

闭包的另一个用处,是封装对象的私有属性和私有方法。

function Person(name) {
  var _age;
  function setAge(n) {
    _age = n;
  }
  function getAge() {
    return _age;
  }

  return {
    name: name,
    getAge: getAge,
    setAge: setAge
  };
}

var p1 = Person('张三');
p1.setAge(25);
p1.getAge() // 25

错误处理机制

throw

//自定义error
function UserError(message) {
  this.message = message || '默认信息';
  this.name = 'UserError';
}

throw new UserError('出错了!');
// Uncaught UserError {message: "出错了!", name: "UserError"}

//实际上,throw可以抛出任何类型的值
// 抛出一个字符串
throw 'Error!';
// Uncaught Error!

// 抛出一个数值
throw 42;
// Uncaught 42

// 抛出一个布尔值
throw true;
// Uncaught true

// 抛出一个对象
throw {
  toString: function () {
    return 'Error!';
  }
};
// Uncaught {toString: ƒ}

try…catch
如果你不确定某些代码是否会报错,就可以把它们放在try…catch代码块之中,便于进一步对错误进行处理

try {
  f();
} catch(e) {
    console.log("catch error")t
  // 处理错误
}
//try代码块抛出的错误,被catch代码块捕获后,程序会继续向下执行。
console.log("continue");

try…catch…finally

openFile();
try {
  writeFile(Data);
} catch(e) {
  handleError(e);
} finally {
  closeFile();
}

上面代码首先打开一个文件,然后在try代码块中写入文件,如果没有发生错误,则运行finally代码块关闭文件;一旦发生错误,则先使用catch代码块处理错误,再使用finally代码块关闭文件。

console

console.log

  • %s 字符串
  • %d 整数
  • %f 浮点数
  • %o 对象的链接
  • %c CSS 格式字符串
console.log(' %s + %s = %s', 1, 1, 2)
//  1 + 1 = 2

console.warn() & console.error()
特殊图标

console.count()
count方法用于计数,输出它被调用了多少次。

console.time() & console.timeEnd()
计算程序运行时间

console.time('Array initialize');

var array= new Array(1000000);
for (var i = array.length - 1; i >= 0; i--) {
  array[i] = new Object();
};

console.timeEnd('Array initialize');
// Array initialize: 1914.481ms

install mysql

https://zhuanlan.zhihu.com/p/42583126
my.ini中的目录要填对
学会看错误信息

Sequelize

https://juejin.im/post/5c259cf46fb9a049eb3bff49
https://github.com/demopark/sequelize-docs-Zh-CN

connection

Problem One:
Please install mysql2 package manually
https://stackoverflow.com/questions/17667368/sequelize-js-you-need-to-install-mysql-package-manually

Problem Two:
Client does not support authentication protocol requested by server
https://blog.csdn.net/u013700358/article/details/80306560

const Sequelize = require('sequelize');

const sequelize = new Sequelize(
    'test',
    'root',
    '112233asd',
    {
        host: 'localhost',
        dialect: 'mysql',
        pool: {
            max: 5,
            min: 0,
            acquire: 30000,
            idle: 10000
        }
    }
);

//测试连接
sequelize
    .authenticate()
    .then(() => {
        console.log('Connection has been established successfully.');
    })
    .catch(err => {
        console.error('Unable to connect to the database:', err);
    });

module

一个模型类对应一个表,一个模型实例对象(DAO)就是一条对应的表记录

// 创建模型实例对象 public static build(options: Object): Model | Model[]
// options:一个对象,对应的就是表中的字段(模型中定义的属性),需要注意的是对该对象的操作不会立即反应到实际的数据库中,需要通过后续的操作进行同步比如save
attr= {
    id:"test",
    content:"iscontent",
    titile:"istitle"
}
let projectInstance = Project.build(attr) // 创建实例对象

// 实例方法
projectInstance.save() // 验证该实例,如果通过验证,则持久化到数据库中
projectInstance.update(updates: Object) // updates:要更新的字段,调用该方法等同于调用.set()然后.save()
projectInstance.destroy() // 销毁该实例(假删除或真删除)


//  public static create(values: Object, options: Object): Promise<Model>
// 构建一个新的模型实例,并进行保存。与build()方法不同的是,此方法除创建新实例外,还会将其保存到对应数据库表中。
await Project.create(attr)

Use Latex to write mathematic formula

install latex

https://zhuanlan.zhihu.com/p/38178015
texlive default installation and use eduroam

latex+markdown

single $

$\pi$

double $$

$$x^3+2x=1$$

basic grammar

\\ 换行

$ $ 公式

\begin{equation} \end{equation} 公式块

frac{1}{x}

$$\frac{1}{x}$$

sqrt[3]{x}

$$\sqrt[3]{x}$$

lim_{x \to \infty}\frac{1}{x}

$$lim_{x \to \infty}\frac{1}{x}$$

x_n

$$x_n$$

x\quad y

$$x\quad y$$

\begin{cases} \end{cases}

$$f(s)=\begin{cases}
\frac{s^3-1}{s^2-1},\quad s\not=\pm1 \
\frac{3}{2},\quad s=1
\end{cases}$$

pandoc

save as .pdf

–pdf-engine=xelatex

.docx .html

Arduino

connect arduino nano to computer

https://www.arduino.cc/en/Guide/ArduinoNano
use ATmega328P (Old Bootloader)

让舵机转起来

https://blog.csdn.net/xieyan0811/article/details/56012044

Complexity

$O(n^c)<O(2^n)$
$O(\log^c n)<O(n^\epsilon)$

10.4-10.10 Learning Notes

.gitignore

https://www.cnblogs.com/kevingrace/p/5690241.html
git上传时忽略自定义文件

如果原来没有忽略怎么办???

https://segmentfault.com/q/1010000000430426
https://www.jianshu.com/p/e5b13480479b

git rm --cashed xxx
git commit -m "delete xxx"

为什么我增加了 .gitignore 里的规则却没有效果?

这是因为我们误解了 .gitignore 文件的用途,该文件只能作用于 Untracked Files,也就是那些从来没有被 Git 记录过的文件(自添加以后,从未 add 及 commit 过的文件)。

之所以你的规则不生效,是因为那些 .log 文件曾经被 Git 记录过,因此 .gitignore 对它们完全无效。这也正是开头那段简短答案所做的事情:

从 Git 的数据库中删除对于该文件的追踪;
把对应的规则写入 .gitignore,让忽略真正生效;
提交+推送。
只有这样做,所有的团队成员才会保持一致而不会有后遗症,也只有这样做,其他的团队成员根本不需要做额外的工作来维持对一个文件的改变忽略。

最后有一点需要注意的,git rm –cached 删除的是追踪状态,而不是物理文件;如果你真的是彻底不想要了,你也可以直接 rm+忽略+提交。

0%